
Winter evenings are perfect for spending time at the vise learning new patterns and stocking up on old favorites. With these bitter cold nights fast approaching (or already here in some parts of the world) I thought I’d discuss some of my favorite tools and supplies, practical discoveries, and my most often used materials to hopefully clarify and simplify some aspects of tying that can be intimidating for beginning tyers.

Getting Started
As has been echoed by experienced tyers everywhere, a newcomer to fly tying should resist the urge to buy a kit, which often includes a vise that can barely hold a hook, poor quality tools, and low-grade scraps of materials that they will either deplete quickly or never use. Instead they should begin by first acquiring a decent rotary vise, bobbin, and a good pair of sharp, small scissors then branch out as needed based on the patterns they want/need to learn.Rite Bobbin

Rotary Whip Finish

Small Hackle Pliers


Old Scissors
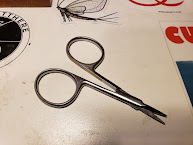 |
| Worn finish, dull, broken at the point, but perfect for the job. |

In some instances scissors aren’t necessary at all. When finishing a wire wrap on a fly it’s always best to do a few wraps of thread on either side of the wire to secure it, then helicopter the tag until it breaks on its own at the tension point to prevent having an exposed tag on the fly. Check out Tim Flagler’s YouTube videos (tightlinevideo) for info on this technique.
UV Light and Resin
A perdigon tied on a jig hook has been my go-to, slump-busting, Euro nymphing dropper in 2021 and a UV light/resin pairing is essential to tying that pattern. With the perdigon, the tungsten slotted bead helps get it down quickly, but the smooth, streamlined resin body is what cuts right through fast water, making it an invaluable fly for nymphing riffles.

Aside from tying flies, I use the UV light and resin for other fly fishing purposes. The light comes in handy to cure UV Aquaseal when patching my waders. However, be careful not to hit the Aquaseal with too strong a UV beam because I’ve found that it will heat up and smoke, so apply the beam softly and slowly. I also apply a thin coat of resin when I repair nicks in my fly line. First, I use Zap-A-Gap to glue and seal the nick and then I coat it lightly with resin to finish it off.
Dubbing Wax
Dubbing comes in an infinite variety of blends and is used on many nymph, dry, and streamer patterns. When applying it to thread in a nice tapered noodle, the application of the varying blends can range in difficulty from mild to impossible without the aid of dubbing wax, the great leveller. For instance, UV ice dub alone is nearly impossible to spin, but with wax it’s a breeze and almost as easy as hare’s ear dubbing, which spins smoothly without any assistance.
The technique I prefer for application is to rub wax on the thread a few times along the space where I want to create the noodle, then rub my fingers on the thread to coat them. I’ve found that coating my fingers is more important than coating the thread, but just sticking a thumb in the wax can get messy.
Forceps
Every responsible angler carries a pair of forceps and though trout are hooked corner jaw the vast majority of times, it’s always good to have them just in case they’re needed. However, the most useful application for forceps: CRIMPING BARBS. I challenge everyone reading this to go barbless.
My Essential Fly Tying Materials
Below is a list of my most frequently used materials with a brief explanation of the use for each, but it doesn’t even scratch the surface of the total list of supplies I use and the multitude of patterns for which the listed materials come in handy; this is simply to help beginning tyers get started. Also, If you've read my post on confidence flies, I’m fairly certain that every material needed for those patterns is included.As always, feel free to reach out with any questions about this post or any other.
Feathers & Herl
-Pheasant Tail (natural, olive, yellow) for tailing and body of numerous nymph patterns
-Hungarian Partridge (natural) for soft hackle nymphs
-Coq De Leon (barred speckled) for perdigon tailing fibers and various other jig nymphs
-Peacock Herl (green, blue, orange) for nymph collars
Hair
-Elk Hair (bleached) for the wing of olive x-caddis and elk hair caddis
-Rabbit Strips (dark olive, black, olive, brown, natural) for larger slump-busters and other rabbit hair streamers
-Pine Squirrel Strips (dark olive, black, olive, brown, natural) for small slump-busters and leeches
-Bucktail (white, olive) for Clousers used for striped bass
Dubbing
-Spectrablend Nymph Dubbing (every color) for collar and body for a number of nymphs, body of olive x-caddis
-UV Ice Dub (mostly caddis green, gray, black, but also others) for flashier collar and body of nymphs (ice dub caddis larva is a favorite)
-SLF Squirrel Dubbing (rusty brown, dark olive) for nymph thoraxes
-Sow Scud Dubbing (light olive, orange, gray) for scud body and legs
-Dry Fly Dubbing (gray, light olive) for RS2 body, WD-40 thorax
Synthetic
-Chenille (fine-med. size in plain or variegated ginger, black, olive, brown) for girdle bugs
-Grizzly Barred Rubber Legs (med. in natural, tan, olive, white) for girdle bugs
-Stonefly Chenille (black/beige, black/ginger, black/coffee) for smaller girdle bugs in 12-14
-MFC Barred Sexi-Floss (yellow small) for smaller girdle bugs in 12-14
-Thin Skin (clear/black specks) for scud backs
-Antron Yarn (brown, olive, white) mostly for nymph bodies and x-caddis tail
-Sparkle Braid (peacock, olive, copper, pearl) for a flashy streamer underbody
-Uni-Mylar Double-Sided Tinsel (12-16, peacock) for perdigon body
-Ultra Wire (size sm-brassie, silver, gold, copper, chartreuse, green, mustard) for ribbing and segmentation of numerous nymph patterns
-Veevus Holographic Tinsel (size sm-med., chartreuse, red, purple, green, black, silver) for leach underbody and experimenting with Perdigons and other jig nymph patterns-Brass Beads (2.0-2.8mm in gold, black nickel, black, silver) for numerous nymph patterns
-Tungsten Slotted Beads (2.8mm-3.8mm in gold, black nickel, silver, copper) for numerous jig nymph patterns
-Tungsten Slotted Beads (3.2mm-4mm in gold, black nickel) for jig streamers
-Tungsten Cone Heads (sm-l in black nickel, black, gold) for numerous streamer and micro streamer patterns
-Barbell Eyes (l-xl in chrome, yellow, chartreuse, red) for Clouser minnows used in saltwater for striped bass-Danville’s Flymaster 6/0 (olive, black, Adam’s gray, brown, fl. fire orange) for nymphs, dries, streamers
-Danville’s Flymaster 3/0 (black, olive) for streamers
-Danville Fine Monofilament Thread- for saltwater flies
-UTC 70D (black, olive, red, yellow, chartreuse, rusty brown) for nymphs and dries
-Uni-Thread 8/0 (olive dun) for nymphs and dries, a favorite for my olive thread Frenchies
-Veevus- 12/0 (black, olive, brown, fl green) for jig nymphs and small dries
-Veevus- 14/0 (orange, red) for collars and hot spots-4X Streamer Hook- Mustad or Daiichi (8-14) for girdle bugs
-3X Streamer hook- Mustad (12) for micro strreamers
-Bead Head Nymph Hook- Orvis (12) for small stream soft hackle pheasant tails
-Curved Straight-Eye Long Shank Nymph Hooks- Orvis or Dai-Riki (12-18) for numerous nymphs
-Emerger Hooks- Dai-Riki or Orvis (14-22) for caddis larva and midges
-Jig Nymph Hooks- Hanak or Orvis (12-20) for numerous jig nymphs
-Standard Dry Fly Hooks- Dai-Riki (12-22) for numerous dries
-Ahrex Trout Predator Light Streamer or Gamakatsu Stinger (1/0-4) for numerous streamers